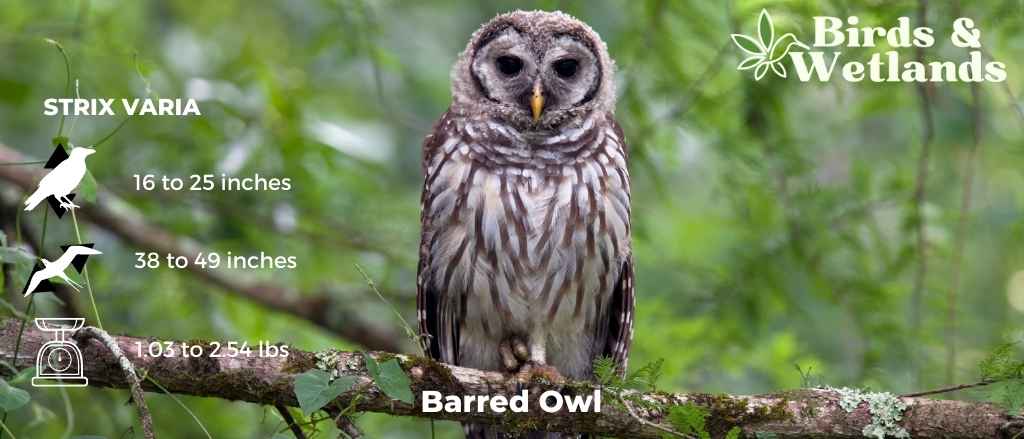
If you’re interested in providing a safe haven for Barred Owls to nest and raise their young, you’ve come to the right place. This article will guide you through the process of building a barred owl nesting box, offering step-by-step instructions and helpful tips along the way. By following these simple instructions, you can create an inviting habitat for these beautiful creatures, contributing to their conservation efforts and enjoying the wonders of nature right in your own backyard. So, grab your tools and let’s get started on this exciting project!
Materials Needed
To build a barred owl nesting box, you will need the following materials:
Wood
The main material for constructing the nesting box is wood. Make sure to use untreated wood to ensure the safety of the owls.
Saw
A saw will be necessary to cut the wood into the appropriate pieces and dimensions for the nesting box.
Hammer
A hammer will be needed to drive in the nails and assemble the nesting box.
Nails
Nails are essential for securing the wood pieces together and creating a sturdy nesting box.
Measuring Tape
A measuring tape will help you accurately measure and cut the wood pieces to the appropriate dimensions.
Drill
A drill will be used to create holes and attach the various parts of the nesting box.
Screws
Screws will be necessary to secure the wood pieces together more securely and create a strong nesting box structure.
Hinges
Hinges are needed if you plan to create a front panel that can be opened for easy cleaning or inspection.
Outdoor Paint
Using outdoor paint will help protect the nesting box from the elements and make it more visually appealing.
Paintbrush
A paintbrush is necessary to apply the outdoor paint evenly onto the nesting box.
Now that you have gathered all the necessary materials, let’s move on to finding the right location for your barred owl nesting box.
Choosing the Right Location
Find a Suitable Tree
When selecting the location for your barred owl nesting box, it’s essential to find a suitable tree. Look for a tree that is sturdy, tall, and provides enough coverage for the nesting box. Barred owls prefer to nest in mature forests, so choose a tree in a wooded area if possible.
Consider Safety
Safety is paramount when choosing the location for the nesting box. Ensure that the chosen tree is away from busy areas and potential disturbances. This will minimize the risk of damage to the box and disturbance to the owls.
Avoid Disturbance
To provide a safe and undisturbed environment for the barred owls, avoid locations near human activity, such as busy trails or recreational areas. Select a quieter part of your property or a nearby natural area where the owls can nest peacefully.
Provide Privacy
Barred owls prefer secluded areas for nesting. Choose a location that offers privacy and protection from potential predators. Ideally, the nesting box should be placed in an unobtrusive and hidden spot within the chosen tree.
With the location selected, it’s time to start building the barred owl nesting box.
Building the Box
Gather the Necessary Materials
Before you begin building, gather all the materials needed for constructing the nesting box. Make sure you have the appropriate sizes of wood cut and ready to assemble.
Measure and Cut the Pieces
Using a measuring tape, carefully measure and mark the wood pieces according to the dimensions specified in your chosen nesting box plans. Once marked, use a saw to cut the wood to the correct sizes.
Assemble the Box Frame
Take the cut wood pieces and start assembling the box frame. Use nails or screws to secure the corners and create a sturdy structure. Ensure that all the sides are aligned properly for a balanced and well-built box.
Attach the Floor
Attach the floor piece to the box frame, securing it with nails or screws. This will provide a solid base for the nesting box.
Add the Side Walls
Attach the side walls to the box frame, ensuring they are properly aligned and secure. Use nails or screws to attach the walls to the frame securely.
Install the Roof
Attach the roof piece to the top of the box frame. This will provide protection from the elements for the nesting box. Secure the roof with nails or screws, ensuring it is firmly in place.
Create an Entrance Hole
Using a drill, carefully create an entrance hole in the front panel of the nesting box. Make sure the hole is of the appropriate size for barred owls to enter comfortably.
Construct the Front Panel
If you wish to have a front panel that can be opened for cleaning or inspection, construct it using additional wood pieces. Attach hinges to the panel and the main box to create a functional opening.
Paint the Nesting Box
To protect the nesting box from outdoor elements, apply outdoor paint using a paintbrush. Make sure to coat all the sides, including the roof, with an even layer of paint. This will help extend the lifespan of the nesting box.
Attach Hinges
If you have added a front panel, attach hinges to the box and the panel to create a convenient opening for cleaning and inspection. Ensure that the hinges are securely attached.
With the nesting box built, it’s time to install it in the selected location.
Installing the Nesting Box
Select the Right Height
When installing the barred owl nesting box, it’s crucial to choose the right height. Barred owls typically prefer nesting boxes mounted at least 12 to 15 feet off the ground. This height provides safety from predators while still being accessible for the owls.
Mount the Box on a Tree
Position the nesting box against the selected tree in the chosen location. Use nails or screws to securely attach the box to the tree trunk. Ensure the box is level and straight for the best nesting experience for the owls.
Secure the Box
To prevent the nesting box from swaying or falling, use additional screws or brackets to secure it tightly against the tree trunk. This will provide extra stability and ensure the safety of the owls.
Ensure Proper Orientation
Make sure the entrance hole of the nesting box faces away from prevailing winds and is not exposed to direct sunlight for long periods. Proper orientation will help protect the box from extreme weather conditions and maintain a suitable environment for the owls.
Now that the barred owl nesting box is installed, it’s essential to know how to maintain it properly.
Maintaining the Nesting Box
Inspect Regularly
It is important to inspect the nesting box regularly, especially during the nesting season. Check for any damage, loose screws or nails, and signs of wear and tear. Regular inspections will help ensure the safety and functionality of the nesting box.
Address Any Issues
If you notice any issues during inspections, such as loose parts or damage, address them immediately. Replace any damaged wood pieces, tighten screws, and fix any other problems that may affect the integrity of the nesting box.
Clean the Box Annually
Once the nesting season has ended, it’s crucial to clean the nesting box to maintain its hygiene for future use. Remove any nesting material, debris, or feces from the box. Gently scrub the interior with warm water and a mild detergent, ensuring no chemicals or strong odors are left behind. Rinse thoroughly and allow the box to dry completely before reinstallation.
By properly maintaining the nesting box, you can ensure its longevity and appeal to barred owls. But how can you attract these magnificent birds to your nesting box?
Attracting Barred Owls
Create a Suitable Habitat
To attract barred owls, create an environment that mimics their natural habitat. Plant native trees and vegetation, providing ample cover and potential hunting grounds for prey. Maintain the surrounding area to minimize disturbances and make it more appealing for the owls.
Provide Nesting Materials
Include nesting materials near the nesting box, such as twigs, leaves, and soft moss. These materials will make the nesting box more inviting and comfortable for the barred owls.
Offer Food Sources
Barred owls primarily feed on small mammals, such as mice and voles. Attract these prey species to your property by providing suitable food sources, such as bird feeders or brush piles. This will increase the chances of barred owls finding your nesting box and establishing a nest nearby.
Minimize Human Interference
To encourage barred owls to use the nesting box, minimize human interference around the area. Avoid excessive noise, keep pets away, and refrain from disturbing the nesting box unnecessarily. This will create a calm and undisturbed environment, making it more attractive to the owls.
Monitoring barred owl activity can be a rewarding and educational experience. Let’s explore some ways to do that.
Monitoring Barred Owl Activity
Use a Webcam
Install a webcam near the barred owl nesting box to monitor their activity remotely. Keep the webcam recording during nesting seasons to capture important moments and behaviors.
Use a Motion-Activated Camera
Set up a motion-activated camera near the nesting box to capture images or videos when the owls enter or exit the box. This will provide valuable insights into their behavior and nesting patterns.
Record Observations
Keep a journal or record of your observations regarding the barred owl nesting box. Note down important dates, nesting activities, and any other interesting behaviors. This will help you understand their habits better and contribute to scientific knowledge.
Share Findings
If you discover anything noteworthy or observe interesting behaviors, consider sharing your findings with local birding groups or wildlife organizations. Sharing information can contribute to ongoing research efforts and help others appreciate and learn more about barred owls.
Providing nesting boxes for barred owls offers various benefits. Let’s explore these advantages.
Benefits of Providing Nesting Boxes
Population Conservation
Building nesting boxes for barred owls can contribute to the conservation of their population. By providing suitable nesting sites, you are helping to enhance their breeding success and overall population numbers.
Research Opportunities
Having nesting boxes installed and monitoring barred owl activity provides valuable opportunities for research and study. These observations can contribute to scientific knowledge about their behavior, breeding patterns, and habitat requirements.
Enjoyment of Wildlife
By attracting barred owls to your property with nesting boxes, you create opportunities for personal enjoyment. Observing these beautiful birds in their natural habitat can be a thrilling and rewarding experience.
Education and Awareness
Nesting boxes for barred owls offer educational opportunities to learn and teach others about these magnificent birds. By sharing knowledge and experiences, you can raise awareness and foster a deeper appreciation for wildlife conservation.
While providing nesting boxes for barred owls is beneficial, it’s crucial to be aware of potential challenges and find appropriate solutions.
Potential Challenges and Solutions
Predation of Nestlings
One of the challenges of providing nesting boxes is the risk of predation on the nestlings. To minimize this risk, ensure that the nesting box is securely mounted and offers protection from potential predators, such as raccoons or snakes. Additionally, avoid placing the nesting box too close to branches or structures that could provide easy access to predators.
Competing Species
Other bird species may attempt to take over the nesting box intended for barred owls. To deter competing species, consider adding a predator guard or selecting a nesting box design with an entrance hole specifically sized for barred owls. This will limit access for other species.
Extreme Weather
Extreme weather conditions, such as heavy rain or strong winds, can pose a challenge for nesting owls. Properly sealing the nesting box and ensuring it is tilted slightly downwards can help prevent water from entering. Natural habitats that offer natural protection from wind and rain are ideal, but installing the nesting box in a sheltered area can also provide some relief from extreme weather conditions.
Invasive Species
Invasive species, such as European starlings or house sparrows, may try to occupy the nesting box. These species can pose a threat to the barred owls and their nestlings. Regular monitoring of the nesting box and taking appropriate action to deter or remove invasive species can help protect the nesting box and its intended occupants.
In conclusion, building a barred owl nesting box can be a rewarding endeavor that benefits both the owls and wildlife enthusiasts. By choosing the right location, constructing the box properly, and providing suitable habitat, you can attract these majestic birds to your property. Monitoring their activity, maintaining the nesting box, and addressing any challenges will ensure a successful nesting experience for the barred owls. In addition to population conservation, research opportunities, and personal enjoyment, providing nesting boxes promotes education and awareness of wildlife conservation. So, grab your tools, follow the steps outlined in this article, and start building a beautiful home for these captivating birds.